Showing posts with label equipment. Show all posts

Friday, January 26, 2018

Yamaha CP-60M

I own my fair share of electric pianos.  I have a Rhodes 73, an ARP 16 voice, a Hohner Pianet-T, and a Wurlitzer 200A.  So why did I want to buy my friend Ben's CP-60M when I found out that he might be selling it?  For starters, the CP-60M is actually an electric PIANO, where the others, although called 'electric pianos', are more like electric music boxes or an electric celeste.  The Rhodes, Wurlitzer, and Hohner all use tines or bars to create their pitch for each key, where the Yamaha actually uses strings.  

The advantage about this over a sample of an acoustic piano is that this instrument doesn't have to be perfectly in tune.  Sometime, you want a sound where some of the keys are slightly up or down in pitch - not out of key, so to speak, but just detuned enough to add some chorus or beating to the sound.  This makes for a rich, beautiful sounding piano.  If I want something perfectly in tune, then I will reach for a sampler.  

I have also been using this with a vintage "harpsichord bar" that I bought and cut to fit the CP-60M.  This bar dangles a piece of metal in between the hammer and strings to make the piano sound like a harpsichord or "thumb tack" piano (thumb tacks onto the hammers of a piano give the same results).  The advantage of this bar is that it is easily removable so you can change back and forth from piano sound to harpsichord sound by lifting the bar.
 

A few more things to mention about this.  The "M" stands for MIDI and although this does not have a MIDI input and solenoids to actuate the hammers (that would be cool), it does have a MIDI out to also layer other sounds along with the piano.  Another great thing about the CP-60M is that it has a nice built in EQ to make the piano pickups sound as bright or as dull as you wish.

Wednesday, January 24, 2018

My first Portativ / Portative / Portativo / Portable Pipe Organ!!!

Here is a photo of the portativ organ that I built.  The pipes were salvaged from a large organ and bought on Ebay.  Everything else was made from scratch and figured out along the way.  Originally, I had piano style keys on the keyboard, but the mechanism that I used seemed to bind the keys where they would stick open.  So I ended up just going to a simpler key.  These are simple button keys on a dowel rod that pushes a block out of the way from the pipe so that the pumped air (you can see the bellows on the back right of the instrument in the photo) can move through the pipe.  The instrument was sealed with caulking.  The first 2 times I put it together, there were leaks or problems with the mechanisms or keys.  I finally feel that it is where I would like it to be now.  The wooden pipes give a hollow steamboat sound.  The metal tabs on top of the pipes are for tuning. 

I have a second set of metal pipes that I plan to use to build a second portative organ.  I hope to use keys of some sort for that one.  If it is successful, then I may retrofit this one with keys again but for now, it works just fine.  

The downside of the buttons is that the dowel that holds them has to be pressed pretty hard and I worry about the dowel breaking if someone tried to play it and put pressure on the button at an angle.  I did see someone build a portative where there was tubing after the key and before the pipe - that method would certainly allow a more flexible key bed layout.  For mine, there is an angled piece that connects the bottom of each button to the lever on the pipe - it was rather cumbersome to make and took a lot of sanding to get things so they would not bind to the surrounding pieces.   The valve that opens and closes has a piece of cork covered in Chapstick to block the passage for air leaks.

Wednesday, December 9, 2015

The Roland CPE-800 and VCA-800

I recently acquired a working, vintage Roland CPE-800 and VCA-800 from my friend Jacob Graham.  His obsession with early 80's Roland gear had led him down the rabbit hole to this beautiful and interesting piece of gear.  He came across it on EBAY and bought it to add to his Roland studio (which consisted of all Roland gear at the time, nothing newer than 1983).  After a few years of owning it, Jacob found he was not using it much and put it up in a local store NYC music store where no one wanted it, and it sat for another year.  I found out that he was selling it when he told me that the music store asked him to come and pick up this large paper weight that nobody wanted.  I immediately said “Oh – your actually selling that?  I will buy it!!!”
 
There were very few of these made and hardly any in use today, from what I can tell.  There are not many references to the CPE-800 online.  There are few photos.  Where there is a reference, it is always a vintage ad or someone saying how obsolete this equipment is.  They could not be more wrong.  People have admittedly destroyed these, piecing them out for parts for the Jupiter 8 or TR-808 – which is a shame and tragedy. 
 
 
This is not a rant about using some obsolete equipment and trying to do things “old school”, somehow believing that you are preserving some piece of history in the process.  Once I had heard about this piece of gear and understood what it does, I was blown away that something like this even exists.  With a modification, I saw a potential to have one of the most versatile, stand-alone modular synthesizer control surfaces ever made.
 
 
In many ways, the technology that this product was intended for is indeed obsolete.  When this product was introduced, it was intended to be used for the motion picture industry.  It would sync to SMPTE time code.  It would allow automated volume control over 15 channels for up to 99 hours provided that it would not run out of memory.  Memory usage only occurs when changes occur – in other words, if the levels stay the same, no memory is used for automation.  The original list price was close to $8,000.  Jacob had bought his for a small fraction of that price and relayed the same price to me. 

In a conversation with someone who worked at Roland during the time of the release, it originally had a problem with the SMPTE time code where the 1’s and 0’s were reversed and it would not work with other SMPTE products but would work great with itself.  This was fixed in software, but the first impression to the industry had already caused some damage and sales were low.  Roland only had schematics and a user manual for this.  No service manual was ever made for this product.  The user manual mostly talks about using the CPE-800 with the VCA-800, but there is also several references to using it as a lighting control and putting it in“scene” mode.
 
 
When used in conjunction with the VCA-800, to call this a mixer would be a false statement.  Even though it looks like a mixer, there is no summing amplifier so channels are not combined in any way.  Each channel has a single VCA, with its own input and its own output...     To call this a controller is an understatement. The board unit by itself automates CV’s (control voltages) that span from 0 to 10 volts.  This is much like the Flame knob recorder or the Modcan CV recorder except it has 15 channels instead of 2-4 channels.  Although the CPE only has a fixed timebase (unlike the Modcan and Flame, where there is a variable speed), the length of the recording can be anywhere from less than a second to 99 hours!  This can also be looped, paused, or restarted...    


These voltages go into the VCA-800  box (shown in the photo above) to control the amplitude/volume.  You can use the faders manually (and they are high quality Alps 100mm faders!), or you can record or playback the changes that you make over time.  The faders are not motorized, but there is a nice pair of LED’s that show if the memory value is higher or lower than where you have the channel set. With a modification that I did, this is an amazing CV controller, can be used with ANY modular equipment, and blows away most modern controllers that are being made today.  15 channels can be used as level controls or voltages, or both, to send signals anywhere in your modular patch.  My modification is shown in the photo - it is the grey rack on top of the VCA-800, with a row of 15 attenuators and a row of 15 CV output jacks.

 
On a technical note, the VCA’s are DC blocked so the lowest frequency that they pass is around 15 Hz.  This cannot pass LFO’s to other modules through the VCA-800, but you can use the voltage outputs that I added to control VCA’s that are not DC blocked and can pass LFO’s or other CV signals.  I added attenuators to each of the 15 voltage outputs so I can scale them down to work with various modules.  I also added another modification where I can start and stop this with a gate signal from an analog synthesizer – so it can be used as a 99 hour, 15 channel, arbitrary envelope generator.
 
 
I would love to buy more of these, add my modification, then sell these as a control voltage source or offer a modification box as a service.  The problem is to find another.  Contact me if you have one of these that you wish to sell.


Video examples of this unit in action will be posted soon.  I just need to edit some footage together.

Tuesday, August 25, 2015

KORG MS-20 MINI


So I made this video a while ago, but I finally got around to editing it together.  It compares my MS-20 mini with an original MS-20 from the late 1970's

Thursday, June 4, 2015

Studio Session "Death of Conversation"

I made the video clip of me recording a part to the title track of my new album, "Death of Conversation".  I am playing a Synergy I digital synthesizer which is borrowed from my friend Ben.  Even though the Synergy has very little editing capability and only a handful number of presets, there is a sample-and-hold feature that can modulate the pitch and is independent per voice.  I LOVE this feature - especially when used in a subtle way, it gives bland sounds a little more animation and momentum, as shown in this video.


Saturday, March 28, 2015

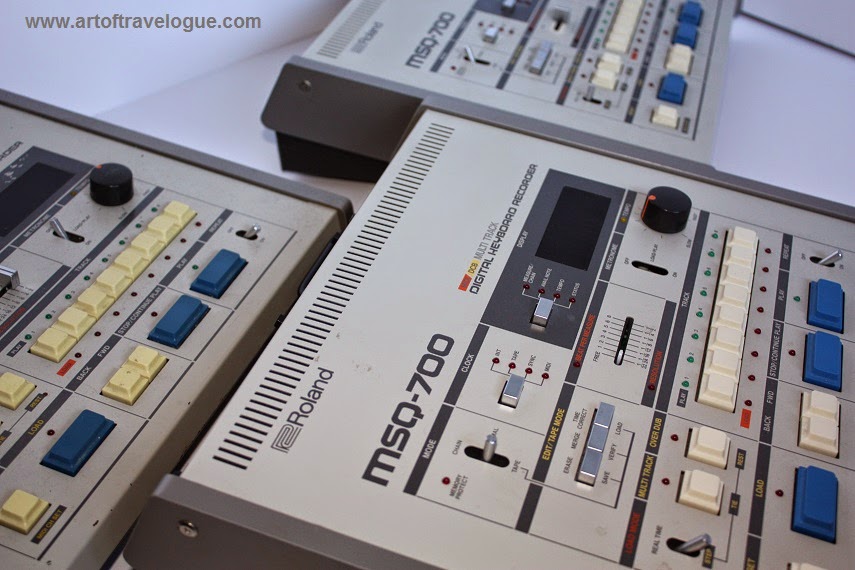
Roland MSQ-700 Sequencer

This is partly a reply to Walter Ego's comment in my post MC-202, Master Clock, Electronic Music Studio Wiring Diagram, but also just my opinion on the MSQ-700.
 
The MSQ-700 was an early sequencer made by Roland, which was primarily designed as a MIDI sequencer, but it also has DCB (which was a pre-MIDI implementation that the JUNO-6, JUNO-60, and JUPITER-8 have... I don't believe that there are other synthesizers that used this format).  The only problem with this (and it justifies the need for 2 of them) is that there is a switch to make them EITHER MIDI or DCB, but not both at the same time.
 
The MSQ-700 also offers DIN Sync IN and OUT!  This means that you can easily daisy chain as many of these together and they will all stay in perfect sync and start at the same time, etc.  I use 2 of these in my studio and have a 3rd non-working one for parts if either of these break on me.  One of these is always in DCB mode, usually connected to the Jupiter-8, but sometimes connected to the Juno-60.  The other one is always in MIDI mode, but these days, I usually don't do a lot of MIDI sequencing.

The actual sequencer in the MSQ is good, but leaves a lot to be desired.  First off, only 8 patterns can be stored in the internal memory.  This is fairly limited if you want to store many different patterns in it.  It is not so bad if you just use it to make small, repetitive patterns or sets of patterns on the fly.  In both of my units, the internal battery is dead or removed so that it does not retain memory if you turn off the power.  I am fine with this because I use new patterns every time I use it anyway.
 
There is a song or chain mode where you can add any of the patterns together in any order, which is nice.  For instance, if you want it to play pattern 1 five times, then pattern 6 twice, then repeat this - it is very easily done.  There is also a "multi-track" function that allows you to play any of the patterns at the same time.  These can then be joined/merged into a single pattern.  It makes a lot of sense to me, coming from the world of 8-track reel to reel recording.  When I used tape machines, you had to choose what to record in what order, then you could mix and merge tracks to dump them to a single or stereo pair of tracks.  This, of course, takes away any editing capability of the single tracks once they are merged so you have to be sure that it is exactly what you want before the merge.
 
One thing that I really love about this sequencer is that you aren't confined to typical measures of 4/4 or 3/4 tempos.  Much like other Roland sequencers (TB-303, SH-101, CSQ-600, etc, etc), you can make the pattern as long as you want, say 7 quarter notes for instance, and it will repeat those in perfect time when synched to another source.  This is great for strange syncopation - having one pattern recorded where it repeats every 9 steps and another where it repeats every 10.  It gives some great movement to otherwise really repetitive, stagnant patterns.
 
Though I own 3 (including the broken one), I never had them all working at once.  I actually bought the 3rd one when one of mine bit the dust and went haywire.  This was mostly due to having the internal battery die and leak over the circuit board.  I have since cleaned it up and use it for parts.  I like having at least 2 working ones so I can sequence MIDI and DCB at the same time if I need to. 
 
One last note about the MIDI/DCB thing.  There are actually 3 different versions of the DCB cable.  Two of these have the typical DCB connector on both ends where the difference is one cable is bidirectional and the other only works in one direction.  The one direction cable was really used to connect two Juno-60's together, where one would play its own sound and the other would play both sounds. If you use the single directional cable with the MSQ sequencer, you have to reverse it when you load in sequences via the keyboard, then reverse it again when you play it back.  Another way around this is to use a MIDI controller, enter the notes in MIDI mode, switch it to DCB, and play the sequence back on the DCB device.  Robert Gutschow (other member of Pivot Clowj and House of Wires) is also a fan of the MSQ-700 and also has 2 or 3 of them, but has my old single directional cable.
 
The other type of cable was only used with early versions of the Jupiter-8 which has the connector on one end and a 0.100"-on-center pin receptacle on the other end.  For years, I didn't think that my Jupiter-8 had DCB and believed it to be an early version before they added DCB.  Then one day, I was at John St James' studio and he had his Jupiter-8 connected to a MIDI to DCB device.  I noticed that his cable was going into the Jupiter-8 without a DCB connector on the back, but through a small opening toward the bottom of the JP-8.  I went home and noticed that mine also had that opening and connector on it.  I went back to John's studio and used a multimeter to figure out the pin connections, made my own cable, and have been sequencing the JP-8 ever since. 

Friday, March 20, 2015

collection?


I rarely have sold anything.  Most of what I have, I have accumulated over a period of 28 years or so.  Most of what I have sold has been redundant.  Where there was a time that I could use 2 Juno-60's DCB'd together, multitracking and sequencing made a second Juno redundant and it was sold to a friend.
 
I also like to have everything set up so that I can just turn it on and play it.  If it is in "storage" or in the corner collecting dust, I question why I should have that piece of gear in the first place.  Although the studio is a collection, I don't consider myself a "collector", but rather a musician that likes to have options open.  Gear is always placed in a position where it is ergonomically useful.  Sequencers are placed next to the pieces of gear that they will be most likely used with.   To me, this is a very important detail in studio organization.

MC-202, Master Clock, Electronic Music Studio Wiring Diagram

Even though I tell people that I have been using the Roland MC-202 as my master clock in my studio for the last 20 years, it somehow does not sink in.  Many friends - who even know some of my methods - are surprised when I press 'play' on the MC-202 and everything starts up or when I turn the tempo knob on the MC-202 and everything follows suit.  I have even heard seasoned veterans ask "what just happened?"

Let me be clear about something though - the studio has grown up around this clock idea and it started only with a few pieces of gear, connected in a similar fashion.  As the studio grew, in came the need for DIN multiples and additional sequencers for various devices. 

Well... here is a wiring diagram of the synchronization between devices in the studio. 


For more information on synchronization techniques, see my other posts on FSK or DIN sync.

Saturday, January 3, 2015

Korg PE-1000 Polyphonic Ensemble


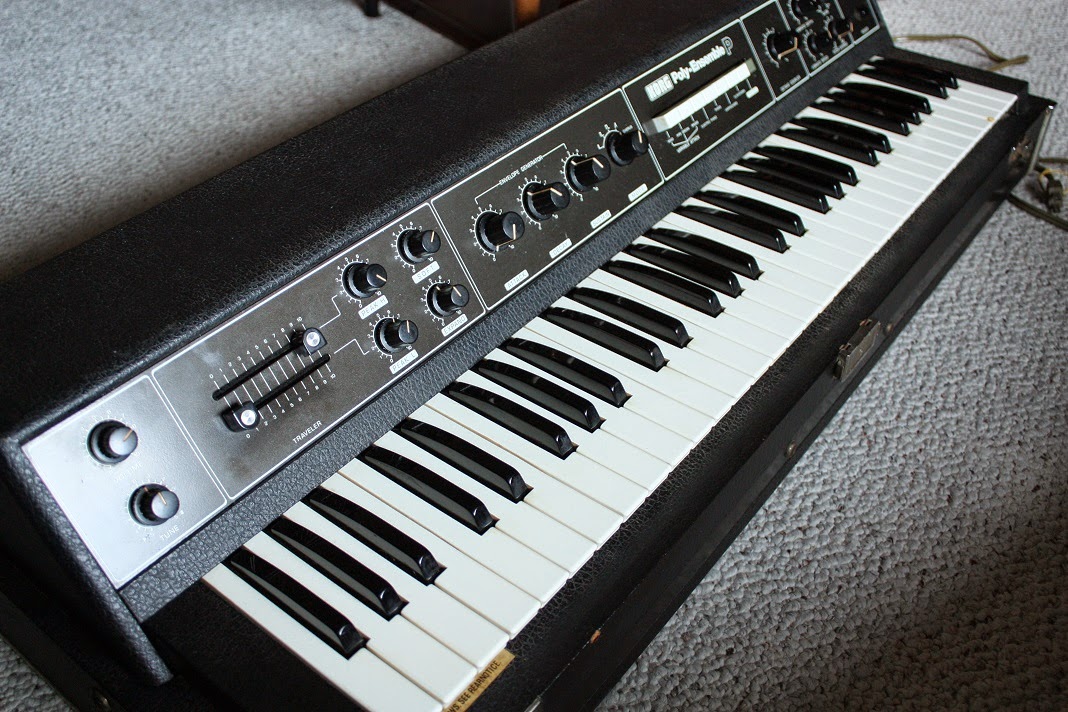
So the Korg PE1000 is not just a simple string machine.  There are several unique features that make this machine stand out above the other synthesizers out there.  Most of this is due to the fact that every single key has its own oscillator.  There is no divide down circuitry.  There are no top octave dividers.  Most of the other string synths (Korg PE2000, Polymoog, Korg Lambda, Roland RS09, Arp Solina, etc, etc) use these dividers to generate all the notes of the octave from one single oscillator.  In some cases, like the Korg PE2000 or Korg Lambda, there are 3 master oscillators that all the other notes are divided down from so each note can generate the equivalent of a 3 oscillator synth - which sounds very rich with chorus even without the chorus effect on.
 
But back to the PE1000...
 
Something that is not obvious from photos of this instrument or many descriptions is that there is a panel below the keyboard that can be removed which reveals a trim pot for the pitch of every note.  You can tune these oscillators so they are slightly out of tune with the scale.  But even without doing this detune, there are plenty of interesting options that Korg piled into this instrument.
 
For one thing, the LFO or vibrato circuit is very interesting.  There are actually 3 separate LFO's (Low Frequency Oscillators) that are controlled by one knob.  These 3 oscillators affect the pitches of different notes across the keyboard.  You can't control which LFO's go where, but Korg arranged this in such a way that when you play a chord or octave, the LFO's affecting each note are likely to be different and therefore the sound is huge and lush. In contrast with most analog synths, when you have a fixed number of oscillators with a single LFO affecting them together, any chord played will rise and fall in the same exact proportion.  With the PE1000, some notes will be rising while others falling or peaking, etc.


Another thing that makes the PE1000 unique is the Pitch Expand control.  This adjusts the pitch across the entire 5 octave keyboard so that if you play an octave, it is slightly higher in pitch than it should be.  If this is adjusted so it slightly affects the sound, then it can bring the keys so slightly out of tune that it sounds interesting when playing chords across the keyboard.  Furthermore, if you increase the value of the Octave Coupler knob, it will  add the volume of the oscillator one octave above to the key that is being depressed.  So if you use a combination of LFO, Pitch Expand, and Octave Coupler, each note plays 2 oscillators (one octave apart), likely having a separate phase of LFO affecting its rise and fall differently, and detuned depending on the amount of Pitch Expand.  Note that the Octave Coupler does not affect the highest octave of this instrument because there aren't higher oscillators to add to the keys.
 
Another thing that is pretty neat, but subtle, is that divider circuits tend to output pulse waves only.  The PE1000 has a saw wave available from every key.  The saw waveform is one of the most harmonically rich waveforms of traditional analog waveforms.  So when you filter the sound, there is a waveform with lots of harmonics to take out via the filter.
 
The filter (or traveler, as they call it) is a series Low Pass/High Pass filter like that found on a Korg 700/700s/800dv.  Each of these have an individual Peak/Resonance control which leads to many tonal possibilities.  Unfortunately, there are no modulation capabilities except for a subtle envelope control on the High Pass filter only, or an expression pedal input again only affecting the High Pass part of this filter.
 
Although this instrument sounds amazing and is packed with numerous features, there are 3 things that I would change (or perhaps modify at some point if I get around to it):
 
1) While the sustain/release time are comprehensively long and it can slowly decay the note long after the key is released, the attack time has much to be desired.  It does not increase slow enough, there is a slight delay before the rise on the "longest" setting, and sometimes a slightly audible thud can be heard before the attack rise.
 
2) There is a chorus waveform which is kind of a PWM (pulse width modulated signal), but unfortunately, the modulation rate of this waveform is fixed by an internal oscillator without any external control of the speed.  I would much like a control over this in order to alter the rate from a slow morphing waveform to a fast, thick, modulated signal.
 
3) Many of the controls are limited and do not affect the presets.  Preset modes like "harpsichord" or "electric piano" only allow a few of the knobs to alter the sound. Only in the "control" preset do ALL the knobs come to life.  I think that this is because most of the presets can be made with the total control of all parameter knobs.  In other words, I don't believe that there are any special circuits or extra filtering that the preset sounds go through in order to make them.  There are a few presets that I wish that they would have at least given the operator control over the peak/resonance of the filter, but because it in part creates the tone of the preset, they don't allow control over these parameters.


Tuesday, October 28, 2014

Akai S20


The Akai S20 was the first sampler that I had bought.  I had played with a myriad of samplers that belonged to various friends before this - some were even borrowed and in my studio for a time, but I never had owned a sampler of my own until I bought the S20. 
 
 
The S20 is a decent sounding 12 bit sampler with very limited sample editing capabilities.  There are no filters, envelopes, LFO's, etc, etc.  There is only start time, end time, loop  points, and various MIDI and button assignment functions.  I actually like how basic it is.  It keeps me from spending hours of time over-analyzing the sound...
 
During the late 90's when I used this a LOT, I mostly used it to sample analog sounds around the studio (mostly drum sounds) and then sequence these using my Ensoniq ESQ-1.  (the S20 does have a built in sequencer but it is only 1 track with no obvious quantization)
 
My unit has updated memory so it can store a whopping 5 minutes mono (yes!  count them... FIVE!!!) or 2.5 minutes in stereo.  This then could be stored in memory but was lost once power was off unless you backed this to disk.  The main drawback to this unit is it only uses floppy disks for memory. 
 
Though I have other samplers now ( like my sampling software on my computer or iPad, or like my Emulator 4XT), I still find myself using this sampler from time to time - mostly because of its portability and no-nonsense architecture.  Recently, I used it live at a show with my Arturia Minibrute.  It was MIDI'd to the Minibrute, then the output was ran into the external input of the Minibrute.  The memory of the S20 was loaded with various waveforms at different octaves - sometimes just a simple saw or analog waveform to thicken up the Minibrute, sometimes string sounds or sine waves at different octaves so I can add various overtones to the Minibrute.  This has brought a new purpose to this old piece of equipment. 

Friday, August 29, 2014

Arturia MiniBrute

The Arturia MiniBrute is a fantastic synthesizer and really stands up to a lot of vintage synths.  I must point out that it has been correctly stated that the mixer section was designed with a lot of headroom so if your levels are too high in this section, the sound can easily become distorted or unusable.  I tend to keep levels under 75% and often around 50% to avoid unwanted overdrive.
Before I bought one, I thought that the “metalizer” of the triangle wave would be one of the more useful and unique features about this synth.  For me, it turns out that adding more than a little of this effect (turning the knob past 30% or so) makes the sound way too bright and harsh in a bad way.  Though I like noise, the sound is more similar to nails on a chalkboard than grinding metal.
One of my favorite features, it turns out, is the sub oscillator.  This surprised me, because it seems like a rather mundane thing to be excited about.  The sub allows for 2 different waveforms (including sine), 1 or 2 octaves below.   It really sounds fantastic to add a sine wave 2 octaves below the square or saw.  The built in saw animator and pulse width modulation allows the ability to make this synth sound larger than a single oscillator synth.
The ability to control modulation with aftertouch is a huge bonus.  This makes it a great synth for leads or solos, but certainly is not limited to such things.  Since I got it, I have used it for bass, snare, various leads, and external filtering/processing. 
The only thing that I think could have made the MiniBrute even more useful would have been to allow each of the waveforms (and especially the sub) an option or switch to be mixed in before or after the filter, but before the “brute factor” pot. 

Monday, July 14, 2014

My studio is finally back together.

... now I just need to organize the rest of the house!  :)


The newest additions are a Roland CSQ-600, a Delptronics ThunderClap, a Korg MS20mini, and a Arturia MiniBrute.

Thursday, February 13, 2014

Magnetic Table DIY

I get a lot of emails and comments concerning the Magnetic Table CV Controller that I built and demonstrated here:


I wanted to add a few notes on the construction and process of building one for those who wish to build one for themselves. 
 
I built it out of spare parts that I had lying around, plus a cheap wooden box that I bought at the craft store, then stained it and made it look older with some raw umber and shoe polish.  Originally, I just fastened an aluminum rod on the end of the joystick for the pendulum arm, but it was a little more wobbly than I wanted it to be and it easily loosened to the point where the subtle changes in position would not transfer to the joystick motion.  I eventually took the joystick apart, removed the "stick" and machined the end of a long aluminum rod to match the end of what was inside of the joystick so it became one long continuous shaft.  Most of this work was done using a lathe, a file and scotch brite for the final smoothing of the end.
 
The arm that holds the pendulum above the table was something that I had salvaged out of a discarded store display from a temp job that I worked at years ago.  It was sitting around my shop for years before I put it to use. It needs to be adjustable for a few different reasons:  1) if you want stronger magnets, the easiest way to make this happen is to stack them.  When you stack them, you need to adjust the height of the arm to compensate for the height of the magnets.  2)  At one time, I had not used it for a few months and when I went to use it, I noticed that the magnet at the end of the pendulum had broke free of the epoxy glue and the magnetic attraction over time had been enough to break that bond.  Since then, when it is not in use, I adjust the arm so the pendulum rests on the table and no additional forces are trying to pull the magnet free of the epoxy bond.  I have been asked where one could obtain the parts to make a similar arm.  The closest thing that I have found is available at Edmond Optics:  http://www.edmundoptics.com/optomechanics/optical-breadboard-components-laboratory-tables/posts-post-holders/articulating-arm-mounting-systems/1369
 
where synthesizer enthusiasts have talked about building their own version of this.  The discussion came up of having the table be curved and maybe a wok could be used.  This is a great idea and though it would certainly eliminate the need to stack the magnets at different heights for the outer extensions of the pendulum, it would drastically cut down on the ability to see the center positions of the pendulum and might not be as visually satisfying.  Honestly, stacking magnets is not a big deal.
 
One last note/comment on the electronics inside of the pendulum.  I simply have a 9V battery going into a couple of LDO linear regulators with input and output capacitors for each X and Y position.  The regulators make the position consistent and repeatable as the battery dies.  Realistically, I change the magnet position so often, that consistency and repeatability are not really practical issues.  Just running the 9V battery through the joystick attenuators would be sufficient.  You could also easily modify this to add oscillators, filters, etc into the box.  I left mine as a CV controller to modulate external oscillators, filters, etc. The knobs on mine strictly limit the range of the joystick itself by adding series resistors in the voltage divider.  One could also process the CV through an opamp and make the knobs control offset and amount.

Thursday, October 24, 2013

Another Installment of Monolith II.

I thought that I would expand on the Monolith II since it was featured in the I Dream of Wires documentary.


The Monolith II is a synthesizer of unknown origin that I bought in non-working condition.  I spent some time restoring what I could out of it.  I still would love to restore the rest of it (which includes a copper touch plate keyboard with moving keys, velocity, aftertouch, surface area, etc).  But it is a much lower priority since I got the Archangel Sequencer/Keyboard from Detachment 3 http://artoftravelogue.blogspot.com/2013/04/here-is-video-that-i-posted-of.html
 
I originally had written a post about the Monolith II here:  http://artoftravelogue.blogspot.com/2012/08/monolith-modular-synthesizer.html
 
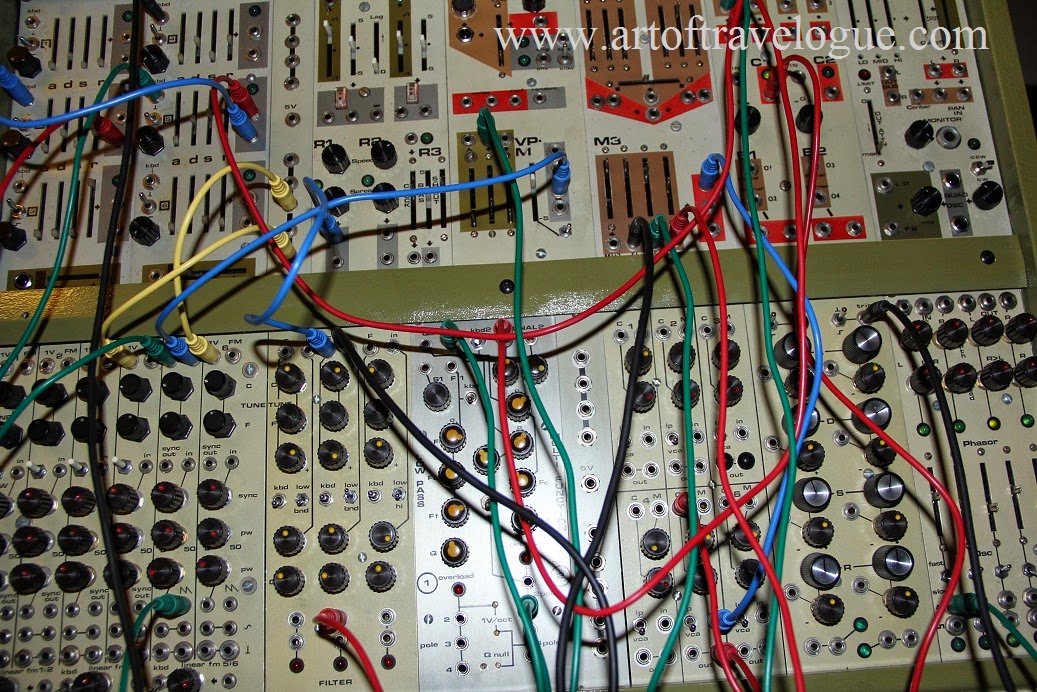
This synthesizer features 6 VCOs, 4 of which can be switched into low frequency but only offer sine and rectangle waves, the other 2 are audio frequency only and also offer a saw wave.  In addition to this, there are 5 LFO's with sine and square outputs, another sine LFO with a 90 degree shifted output (so you could make a quadrature LFO with these 2 outputs and inverted outputs), 3 lowpass/bandpass filters with a nice overdrive control, 1 lowpass filter with multiple pole outputs (2, 3, and 4), and one multimode filter (LP, BP, HP, but no notch mode) with both 2 and 4 pole outputs. There are also 2 comparators, 3 smoothed random generators, 1 sample and hold, 6 envelopes (2 of which do not work), 2 voltage controlled envelopes (1 of which does not work), 6 VCA's that can also act as nonresonant filters with a switch (1 of which does not work), 4 "phasors" (stereo input and output with 1 phaser going from L to L, one from L to R, one from R to L, and one from R to R), 2 awesome ring modulators, 4 additional VCA (without controls, just input/CV/output jacks), several mixers - some for audio and some for CV, and an external input with a built in microphone complete with level, compressor, envelope follower, and gate extractor.
 
In my studio, I always have this synthesizer on and often use modules from it to compliment other modular synths around the studio.  There is rarely a patch that I make in my studio that doesn't use the Monolith II to some extent.
 

Thursday, September 19, 2013

The Oberheim OB-1

After years of looking for a reasonable priced OB-1, one fell into my lap.  Actually, I had borrowed my good friend David's OB-1 for a while and he eventually made a deal with me. It now resides at Ka-boom as part of the permanent collection.  Thanks David!  David's entertaining blog on synths and life can be found here: http://thecompleatsynthesizer.com/


The Oberheim OB-1 was the first monophonic synthesizer to have any sort of memory bank.  This means that you could save the knob settings and recall them in order to instantly change the sound, rather than having to memorize or map the position of each knob and turn them all to another setting in order to change the sound.  From a studio environment, I prefer the latter because you always get something slightly different, but for a live setting, memory does prove to be important.
 
Sonically, the OB-1 sounds pretty great.  Some call this a glorified Oberheim SEM with a keyboard, but it is not.  One of the main reasons for me to say this is because the filter is completely different.  On the SEM, the filter is a multimode filter that does not go into self oscillation.  On the OB-1, the filter is only Lowpass, 12 or 24 dB/octave, and the resonance will go into oscillation.  
 
The oscillators can sync or cross modulate, but there is only ON/OFF for these options and no variation or amount in between.  Another limitation of the OB-1 design is that the oscillators and noise are either ON/HALF/OFF.  This makes any kind of intricate mixing between the sound sources next to impossible.  One unique feature is that each oscillator has a sub oscillator that can be switched in as well. 
 
The waveform modulation on the oscillators is interesting.  At first glance, it looks like a PWM (Pulse Waveform Modulation), but it can also change the Triangle Wave to a Saw Wave, depending on which waveform is selected.  This can add a new dimension to the sound that is not heard on many synthesizers, especially when the oscillators are synched or cross modulated.


The strange shaped bender has a mode that I love:  If put in LFO mode, then moving it forward changes the amount of LFO to the pitch/frequency of the oscillator.  If moving it backward, it modulates the oscillator with the noise source.


Tuesday, September 17, 2013

Mixing outside of your computer

In this day and age, many people mix their songs strictly inside of the computer and often do not have a need for larger mixing boards.  Fortunately for people like me who want to have many channels available (for a variety of reasons that I will get into in a minute), the price of large mixers on the used market is more affordable than ever and one can usually find some amazing deals.
 
 
There are several reasons that a mixer of at least 24 channels comes in handy in the recording studio – even if the majority of your work is done inside of the computer.

 
For one, equipment that often gets used can be “hardwired” to a channel and used or turned on at any given time or when needed.  I have many instruments and microphones set up this way.  It makes the recording process quick and painless.  If used this way, the channel gain, EQ, and levels for recording can be set where there is no need to tune things in or tweak any of the settings.   A good example of this would be for the drums around a drum kit.  If you have various microphones around a drum kit (kick, snare, overheads, etc), you can leave them set up on a group of channels on the mixer and not have to worry about the pain of moving the mics around.  This, of course, also assumes that you have a drum kit set up in the corner of your studio.  Many of the larger boards have decent pre-amps and quiet EQ’s so it is convenient to set up a channel for a particular mic or machine and leave it be.
 
 
Another reason to have a large mixer is to be able to submix a group of instruments together before they go into your computer interface.  This is easiest if your mixer offers a “bus” section where there might be additional outputs that are assignable per channel.  This is especially handy if you want to group sounds together and keep them on the same track.
 

The mixer that I use is a Tascam M3500.  There are 2 versions of this; a 24 channel version and a 32 channel version.   I have the 24 channel version.  (Actually, each channel strip has a large and small fader, which really makes these mixers 48 or 64 input, depending on how many channels are on the mixer).  The photo above shows the M3500 on top and my Mixed Logic USB controller on the bottom (the USB controller processes no audio but has motorized faders to jump to any Protools project that I open up).  On the M3500, I always have the first 9 channels dedicated to various microphones around the studio (drums: kick, snare, 2 overheads, my pair of matched microphones, and a few other microphones that can be set up around the studio for different applications).  Channels 10 through 19 are wired to various outputs of drum machines and modular gear on the left side of the studio.  Channels 20 through 24 are wired to whatever I connect from the right side of the studio (usually samplers or the Wurlitzer piano or various string machines).  The small faders are for playback devices – like tape decks, CD players, the computer output, etc.
 

One final reason to use a mixer, is to actually mix!; to do mixing outside of the computer.  If your interface has multiple outputs, you can route each one to a different channel and then mix, blend, fade, and adjust them back into a single or stereo set of inputs in your computer.  (when doing this, make sure that you don’t create a feedback loop by mixing the computer output back into the input).  For this type of use, the way the faders feel on the mixer is critical.  I am very much a sucker for smooth faders.  The faders on the M3500 float like a knife through softened butter.

Thursday, September 12, 2013

Albums are often influenced and shaped by the equipment used:


Whenever I get a new piece of equipment, it ends up being a prominent part of the sound for the particular album I am working on at the time.  Very rarely do I use only one specific piece of gear for a song though; usually it is a combination of various pieces of equipment combined together.

For instance:

House of Wires – Monogamy: was heavily sample based because I had just bought an Akai S20 and was going sample crazy.

Travelogue – The Art of Conversation: 90% of this album was done with synthesizers.com modules.

Travelogue – Telegraph:  Much of this album is the Korg Mono/Poly.  Some songs like Seasons are nearly all Mono/Poly.

Travelogue – Braille:  The EML Polybox and various string machines (Moog Polymoog, Roland RS-09, etc) are all over this album.

Jon Sonnenberg/Israel Slick – Prometheus Project:  On the songs of mine, which consist of half of this album, heavily used a Yamaha CS-40M and the EML Polybox.

House of Wires – You are Obsolete, Pivot Clowj (any of the albums), and Travelogue – The Noise is only Temporary: are free-for-alls where anything and everything in the studio was used.

Travelogue – Imaginary Hospitals: a free for all, but strictly analog synths.
 
Jon Sonnenberg – Acoustic Selections: a free for all, but strictly acoustic instruments.

Tuesday, September 3, 2013

Semsemia, Anklung, and Gopichand


I collect, own, and play a number of musical instruments, whether electronic, electric, or acoustic.  I used a variety of acoustic instruments on my "Acoustic Selections" album.  There are a couple reviews of the album that claim that I used homemade instruments and names like semsemia, anklung, and gopichand must be made up names.  Although these words are unfamiliar to most of the western world, these are real names for instruments and not made up words.  Any of these instruments can be searched for and numerous images can be found.
The Egyptian semsemia that I have is very much out of tune and I use it more for a percussion dissonance than any type of melodic track (unless I play a single string with a glass slide).  I leave it out of tune because when I first got it, I took all the strings off and all the pegs out (I can't remember the reason that I did this, but I am sure there was one), then I must have put pegs back into the wrong slots because ever since then, some of the pegs do not grab.  I even tried the old violinist trick of using chalk to cause more friction between the peg and the hole.  No luck.  I need to just take it apart again and find the best hole for each peg.
Both the semsemia and anklung have a prominent place in the acoustic version of the song "Winter".   They can distinctly be heard on that track. 
Though I own an authentic gopichand, the one that I used and recorded with was homemade out of a metal can, wood, and a guitar string.  I authentic one uses traditional animal skin rather than the bottom of a can, but the concept and method of playing remain the same.

Tuesday, July 16, 2013

The Roland TR-808


For many years, I had the opinion that the Roland TR-808 was overpriced, over-sampled, and over used.  I felt that my modified TR-606 was a nice substitute and could easily make similar sounds and if I needed exact sounds, there are plenty of samples available for nearly every sampler, softsynth, drum machine, etc…  So why would I buy one?

Originally, I bought one because I like the “TR” style programming and I needed more trigger outputs for modular synthesizers.  When I bought it, there were not a lot of other machines available with more than 1 or 2 triggers and the 2 triggers out of my TR-606 just was not enough for the types of sequencing and triggering I wanted to do. The TR-808 has 3 separate trigger outs, plus individual outputs for each sound, so every sound is able to be processed separately (so you could run the individual outputs through envelope followers and gate extractors for more triggers). Before I got this, I was very close to getting a Simmons drum sequencer (which would have given me 8 trigger outputs), but that deal fell through and I was left getting the 808.  I honestly did not think that I would be using any of the internal, overused sounds at all.  I was wrong.
Before I ever owned one, let me say that I had already understood that each sound had adjustments that could be made and had individual outputs (which I think is one of the things that make this and the TR909 so popular and expensive 30 years later).  Furthermore, I had played with programs like Rebirth which simulates many of the sounds from the TR-808, TR-909, and TB-303. 
Kick:  The first thing that I noticed, however, when I got the 808, was how short the kick drum can become.  So many samples have the kick long and boomy, I actually find the kick most useful as a short thuddy click.   It is tighter and deeper than most samples that I have heard of the "short" 808 kick.  Another nice surprise is that when the decay of the kick is long and the kick is played multiple times, each repetition sounds slightly different and the way the kick retriggers out of the long decay is not captured with any sample that I have heard. 
Snare and Clap:  the snare and claps sound fairly predictable, considering how many times we hear these sounds in pop music.  They really become unique when compressed, distorted, filtered, etc.  Because these are from analog circuits, a heavy compressor can bring out the randomness of the noise source behind the sound and make some really interesting new snares. 
Clave and Cowbell:  My favorite sound is the Clave – it sounds like an actual wood clave to me.  My least favorite sound is the Cowbell – it doesn’t matter how you process it, the perfect 5th interval of the cowbell sound is completely unusable to me and is almost laughable when I hear attempts to use it in a song.
Toms, Cymbals, Hi Hats:  These sounds are used so often in all kinds of music and are distinct and recognizable.  I think that one of the reasons for their popularity is tone and quality of the sounds are not overtly flashy, but fit in nicely: the toms are just simple tones and can be tuned; the cymbals are aggressive enough to signify an accent; the hi hats are short and bright enough to carry the pattern without being distracting.

Because of the flexibility and quality of the sounds, the TR-808 to me is as much of a musical instrument as it is a drum machine.

Sunday, June 30, 2013

The Roland SH-101


The SH-101 is often my go to mono synth of choice.  The sounds are not too complex, the voltage tracks at 1V/octave so it interfaces with my modular stuff well, and the sequencer is deceptively useful (though it only stores 100 notes). 

Believe it or not, I actually bought my SH-101 brand new from a music store in 1984.  I was in Jr. High and I had won $100 in a contest and it was burning a hole in my pocket.  Goodman Music in LA had a deal on the SH-101 where they had over stock and were blowing them out at $160 or so. My parents were kind and encouraging enough to go pick it up for me and loan me the rest of the money (which I ended up paying back through $2/week allowance and helping with my brother's paper route). 

My SH-101 has made an appearance on nearly everything I have recorded in some way, shape, or form.  Many times, I just use the sequencer to control other synths that don't have a sequencing option, but I also rely on the internal sounds from time to time as well.  For deep bass sounds or kick drums, it is perfect and nearly unbeatable.  For simple, single oscillator, lead sounds, it sounds great.  My favorite thing to do with it is to turn the modulation to noise, then add a little noise modulation to the oscillator to get kind of a melodic static sound - sometimes you can mix this sound in to make a quasi-reverb when layering with a clear, bright, similar sound of the same pitch.

The sequencer, as I stated, is deceptively useful and powerful.  Rests and ties can be added and it can be clocked per step.  When using it with a drum pattern trigger, the trigger doesn't have to be a steady quarter note, or whatever - it can be syncopated and sending any rhythmic pattern that is programmed or chosen, then the sequencer will follow that pattern.  Because it is so easy to program, I tend to use this sequencer for many simple, repetitive patterns.  If one wishes to transpose to a different key, then you just hold the transpose button while the sequence is playing back, and press the key that you wish to transpose to.  The "C" key is the default, or where no transposing has occurred.